Friday, 28 February 2014

beautyuk Grit-FX polishes review!


Hello my lovely friends.
I have another review of polishes for you today!
I was kindly sent the Grit-FX collection polishes to review from beautyukcosmetics


Beautyuk product information
GRIT-FX - the newest addition to the range features fine "sand" particles that give a textured finish for an unique, gritty, urban look.
The latest addition to the posh polish nail range gives nails a gritty/sand texture for an edgy, street-wise nail look.
Themed around famous UK urban districts, clubs and people, the Grit-FX range brings street chic in a range of 6 on-trend shades.
My Rating
Rating Very good grit/sand effect textured polish 
Easy to use = 9/10
Application = 9/10 good brush
Drying time = 8/10
Lasted well = 8/10
Coats = 2
Finish = Textured with a slight matte sparkle look.

Removal = Very easy to wipe off.
Overall = 9/10  I would recommend these polishes.
From: £3.49 

I decided to do 2 sets of polishes on one hand for each manicure swatches.

Manicure 1 

Left polish is in no.25 - banksy (slate)
Right polish is in no.21 - fabric (baby pink)
I added 2Nail art flowers in brown and pink.

I applied 2 coats of each polish on each nail and then simply stuck on the nail art flowers for a fun effect nail manicure.
 
Manicure 2

Left polish is in no.23 - printworks (turquoise)
Right polish is in no.24 - kensington (nude)
I added star studs and shell studs to this manicure.

Again I simply applied 2 coats of polish on each nail then I stuck on the nail art studs.I think this gives this manicure a nautical theme look about it.


 Manicure 3


Left polish is in no.20 - bird cage (bright pink)
Right polish is in no.22 - shoreditch (electric blue)
I added some fun bright nail art studs for this manicure.


Once again I simply applied 2 coats of polish on each nail then I stuck on the nail art studs.I think this is a vibrant fun party manicure! 

That is all for this post Huge thank you to Beautyuk for sending me these fabulous polishes to review!
Please follow my blog if you haven't already,
Thank you :)
♡Dawn♡


*Product was sent to me for consideration for the purpose of this review only. No monetary compensation was received.


Thursday, 27 February 2014

Sparkly Nails review Nail art.

Well Hello my dear friends!!
No I have not abandoned you all or my blog I just have had no internet connection the past few days sorry about that cable decided to do updates and didn't reconnect me back properly ugh anyways hope you all well and good.

I have a product review for you today from Sparklynails web site who kindly sent me to products to review on my blog.
I have reviewed products for sparkly nails a few times now and I love reviewing for them they are a fabulous online store check it out and click HERE 


I was sent Nail art pearls and Flower nail stickers.

I decided to do a wedding type theme nail manicure for today's review.

Items I used.
  • O.P.I lacquer polish in Happy Anniversary.
  • NYC polish in Pinstripe White.
  • Rimmel 60 second polish in Silver Bullet.
  • NYC top clear coat.
  • Technic nail art pen in Silver.
  • Glitter nail art pen in holographic silver.
  • Sparkly nails Nail art pearls.
  • Sparkly nails Nail art flower stickers.


I used the NYC white polish as a base coat for the Rimmel polish I then used the silver nail art pen and did a few flower petals on the middle and ring finger I went over the silver with the glitter art pen.
I then stuck the flowers on the nails and in the center of them I placed the pearls using a dab of NYC clear polish. then went over it with a top coat and all done.


Reminds me of a formal/wedding manicure I like how these look and the flowers look lovely.


That is all for today more posts to catch up on tomorrow and for the weekend so stay tuned!
Don't forget to use the Sparkly Nails promo code SN03141 Exp 31/03/2014.
I want to thank Sparkly nails again for sending me the 2 items for review.
Take care friends
Please follow my blog if you haven't already, and check out the other nail art bloggers below Thank you :)
♡Dawn♡


*Product was sent to me for consideration for the purpose of this review only. No monetary compensation was received.

Sunday, 23 February 2014

Finger Food’s Theme Buffet Challenge! Cute

Hello friends.
Did you all have a good weekend? I hope so.mine was relaxing and cosy spent with my husband and daughter :)

It is that time again for my next mani for the Finger Food’s Theme Buffet Challenge Cute!

I decided I wanted to do something cute and cuddly what better than the Forever Friends bear! and this is dedicated to you all my forever friends nail buddy's :)


I used mainly Acrylic paints for this mani and a NYC clear top coat when I finished it.


I took pictures of my mani with my daughter's Forever Friend's Teddy Bear she has had since she was a child (now 17 hehe) :)
I really like this cute manicure I hope you do to! hugs :)

 I have more posts shortly.
Please follow my blog if you haven't already, and check out the other nail art challenge bloggers below Thank you :)
♡Dawn♡ 


Thursday, 20 February 2014

Geisha Sisters nail art.


Hi Friends it's almost Friday!!
I am sorry I haven't posted the past few days as I have had a busy week sorting a few things out but not to worry I haven't forgotten you all "hugs" I hope you all doing ok and things are going to improve if you are still effected by this awful weather.

I have a different type of nail art for you today I decided to do something oriental /Japanese and I thought what better than to paint some Geisha ladies (I call Sisters) as I have painted 3 Geisha's and did this with my Acrylic paints by hand using my nail art brushes and artist brushes.


The Japanese writing I did on the first finger means Luck.

The Japanese writing I did on the ring finger means Longevity


I love how these turned out! I do think writing Japanese was a little tricky but I guess practice makes perfect :D

I will have more posts and reviewing some products shortly!
As always Thanks for stopping by please follow my blog if you haven't already and check out my charity nail art challenge bloggers below Thank you :)
 ♡Dawn♡

Monday, 17 February 2014

Finger Food’s Theme Buffet Challenge! Abstract

Hello Lovely friends.

Hope you all ok?and this bad weather in the UK will settle and everyone can get back to normal.I wish those who are effected well and be safe and warm xx.

I have2 nail art abstract manicures today. for the Finger Food’s Theme Buffet Challenge

First one is rather weird lol I am unsure if I like it or not so I thought ahh just put it up as I kinda experimented with the 2 manicures so here is the items used for the first manicure.


I name this the Butterfly wing Abstract.
  • Glitter top coat(sorry no name)
  • NYC polish in Pinstripe White.
  • Maybelline polish in Ceramic Blue.
  • Barry M paint polish in Peach Melba.
  • Barry M Textured Effect Glitter polish in Princess.
  • Rimmel polish in Spring Yellow.
  • Barry M Gelly polish in Grapefruit.
  • Etude House Ice-cream polish in Blue Mint.
  • Beautyuk Glitter polish in Mermaid.
  • MUA Clear top coat.
  • Beads/pearl wheel.
  • Nail art glitter pens in Blue Gold Light Pink Dark Pink Silver.
  • 2True Glitterati polish in Shade 6.
  • Black marker pen.


I started with a White base coat of NYC polish.
Then when dry I applied the Maybelline polish to the thumb.the Barry M peach melba to the first finger. the Rimmel polish to the middle finger.and the Barry M Grapefruit to the ring finger then the Etude house polish to the little finger.
When dry I then used the different glitter pens to each nail after it dried fully I used the marker pen and did a few lines which linked around the edges kinda like butterfly wings.
I stuck on some beads in the centre and I applied a top coat.

(my phone camera hasn't took the best pics to show you the glitters but oh well I did try.)
I still unsure if I like this or not lol but anyway let's get on with my next manicure.


Items I used for this Neon Summer Abstract...
  • BC polish in Sapphire.
  • NYC polish in Pinstripe White.
  • Barry M Gelly polish in Greenberry.
  • Barry M silver foil effect polish.
  • Barry M paint polish in Vivid Purple.
  • Jess Glitter polish in Ibiza.
  • 2True Glitterati polish in purple shade.MUA clear top coat.
  • CK Glitter polish in Hallucinate.
  • B&M Neon polishes in Yellow and Orange.
  • W7 Neon polish in it's Pink.
  • La Femme Neon polish in Yellow.
  • Zig Zag sizzors.
  • Masking tape.
  • Make-up sponge.


I started with a NYC white base coat.then I applied the Neon polishes in a row onto the make up sponge.I did this a few times to get the colour more vibrant.
I then applied a clear top coat.when dry I used masking tape and cut different pieces and stuck them onto each nail and used the different polishes over the tape.pulled the tape off and applied a CK glitter top coat.
The thumb I applied the 2True purple glitter.not sure if I like the thumb really but I do like the gradient effect.


There we have it my 2 manis :)
Thanks for stopping by please follow my blog if you haven't already and check out the other fabulous nail  bloggers below Thank you :)
 ♡Dawn♡


Thursday, 13 February 2014

My Be mine Valentine's Day nails.


Hi everyone 
I hope you all are safe and well in this bad weather we are having.

I have another Valentine's day nail art mani for you today.


I used a Letter stamping plate for this mani.
  • Konad Stamping plate I am happy.( PR sample)
  • Jess polish in White.
  • Sinful Colors polish in Cotton candy.
  • Nail art polish for stamping.
  • 2True pro salon shine polish in Jessie.
  • Disney nail art pens in Red & Pink.
  • Technic clear top coat polish.


I started with a base coat using the Sinful Colors Cotton candy on the thumb and middle and Little finger.
I used the 2True polish on the first finger and ring finger as a base.
I then used the stamping polish and stamped the word BE on the thumb (I am not to happy with the letters as they ran a little using the top coat ugh) then M on the first finger I on the middle N on the ring and E on the little finger.
I then used the nail art pen in red and painted hearts around the letters and did the same with the pink nail art pen.
I then painted some heart shapes and stuck some nail art heart stickers on the nails and applied a top coat.


That is all for now friends!
I will be posting more nail art shortly.
Thanks for stopping by please follow my blog if you haven't already and check out my charity monthly nail art challenge bloggers below Thank you :)
 ♡Dawn♡


Tuesday, 11 February 2014

Finger Food’s Theme Buffet Challenge! Hearts

Hello Lovelies.
How are we all? Hope you're all ok and your week is going well.

I have my Hearts manicure today for the Finger Food’s Theme Buffet Challenge


Items used for this mani are...
  • 2True pro Metallica polish in Artemis.
  • Laval polish in White.
  • Barry M nail paint in Vivid purple.
  • Disney nail art pen in Pink & Cream.
  • Glitter nail art pen.
  • Dotting tool.


I used the White polish as a base.I then used the dotting tool and used the purple polishes to make heart shapes.I used the same purples to dot the ring finger.I then used the Barry M polish on the thumb making a heart shape on the tip of the nail and did the same on the first finger on the top of the nail using the 2True polish and painted a heart shape on the middle finger nail tip.
I outlined some of the hearts using dots with the nail art pens and did some more dots on the hearts and there it is done!


Thanks for stopping by :)
More posts shortly.please follow my blog if you haven't already
check out the other heart manicures below.
 ♡Dawn♡


Saturday, 8 February 2014

Finger Food’s Theme Buffet Challenge, Birthdays/Celebrations


Hello friends.
What a week weather wise! here were I live in the north west of the UK has only had bad gale force winds and rain.but I do wish those who are effected by the floods and severe weather down south are safe and well I cannot imagine the stress and upset of what they are going through.

Now its time I posted my Birthdays/Celebrations nail art for the Finger Food’s Theme Buffet Challenge!


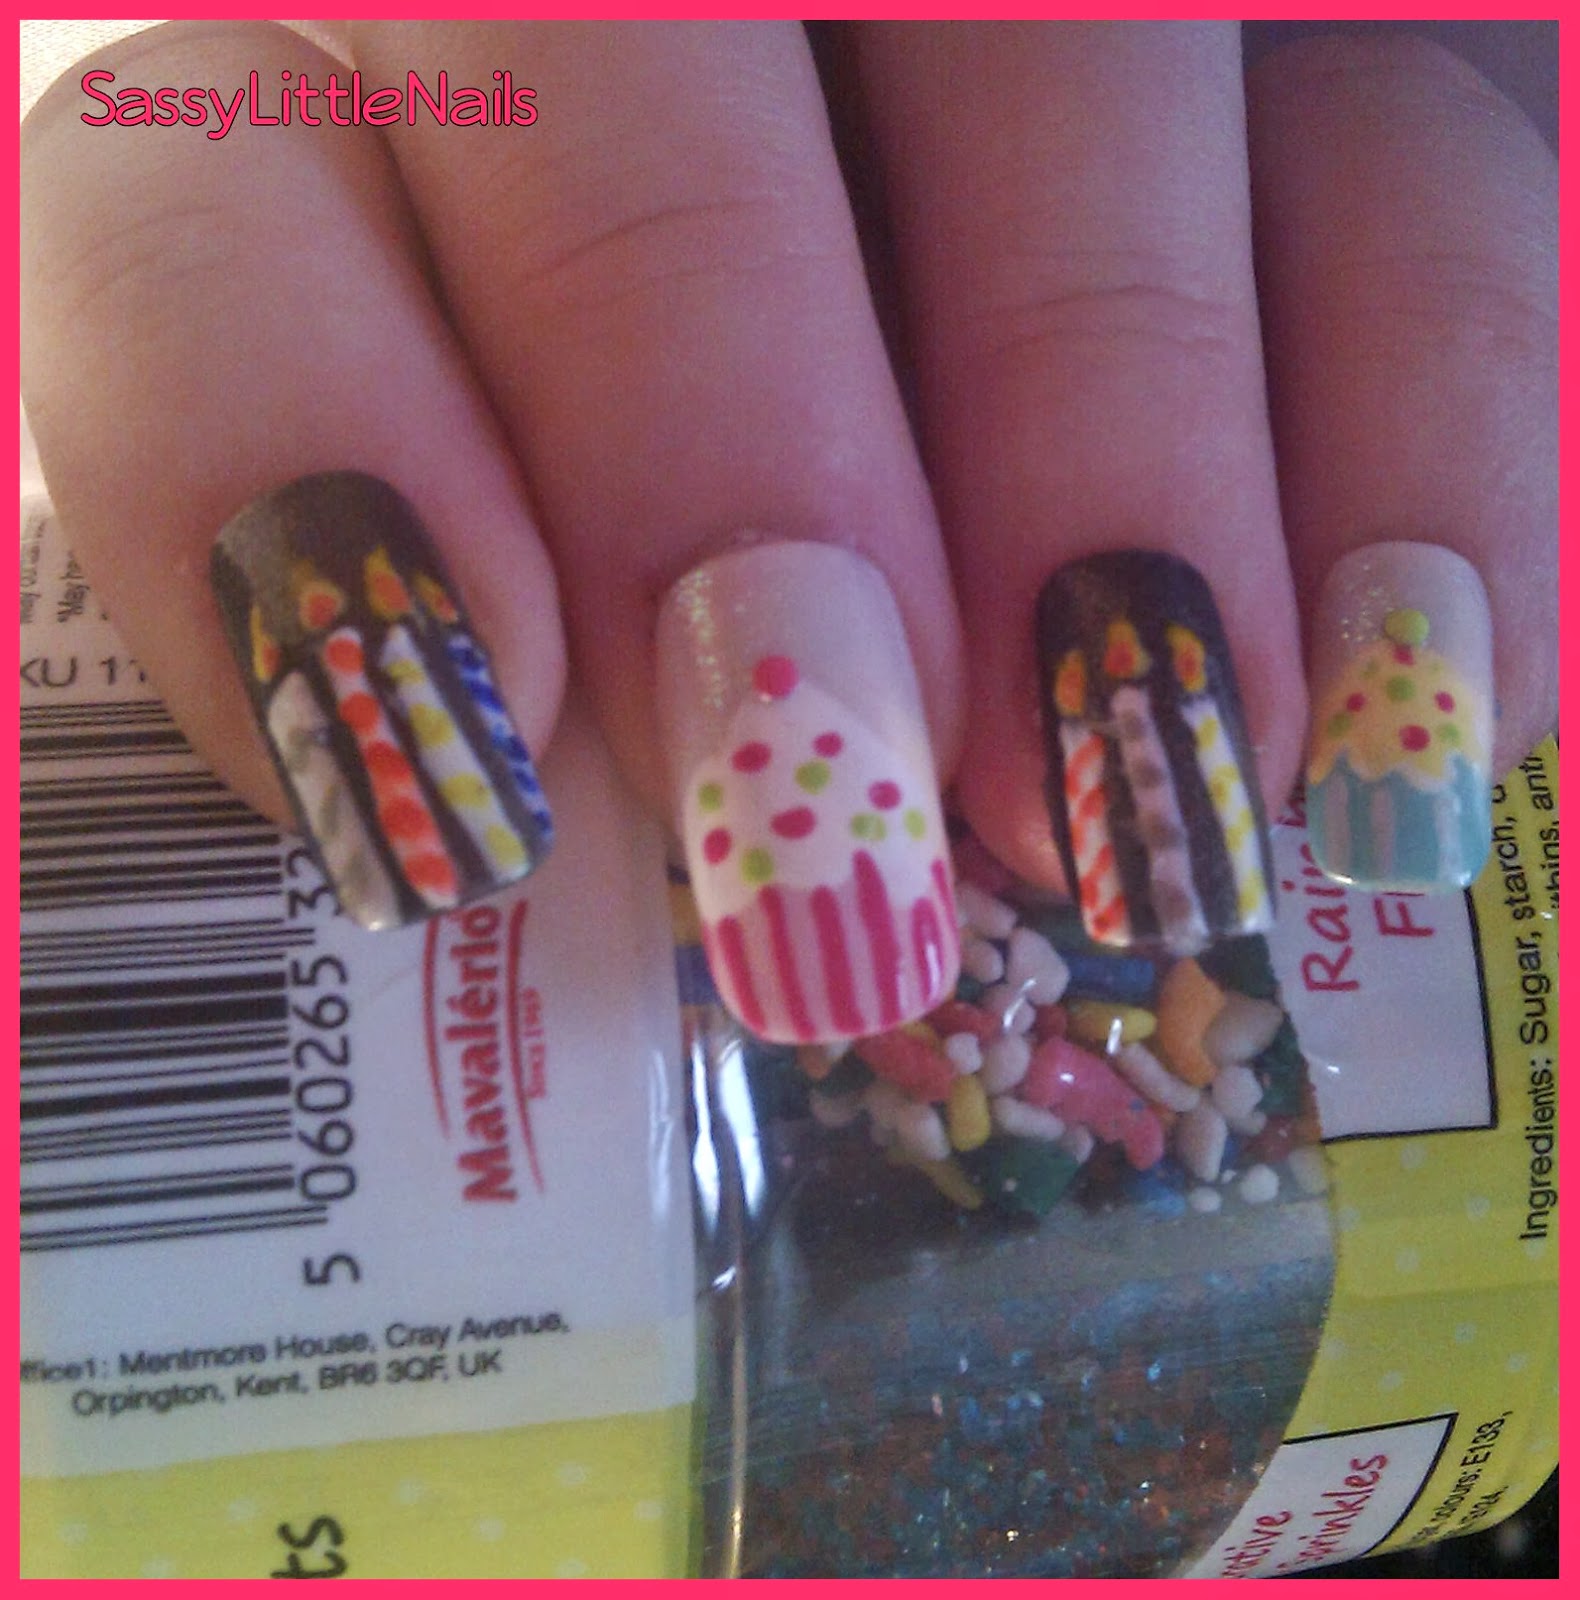
I decided to do Birthday cupcakes and candles.


 Above is the picture of the items I used for my nail art.
  • Glitter top coat.
  • Sally Hansen polish in Polar Bare.
  • Manhattan polish in Yellow.
  • Sinful Colors polish in Snow me White.
  • Ciate polish in Kiss Chase.
  • Maybelline polish in Porcelain Pink.
  • Revlon polish in Orange Pop.
  • Revlon polish in Mistletoe.
  • NYC polish in Blue Sky.
  • Technic nail art pens in White and Silver.
  • Disney nail art pens in Cream and Green.
  • Various beads/rhinestones nail art wheels.
  • Dotting tool.


I started with a White base coat using the Sally Hansen polish on the Thumb and middle and little finger.
I then used the Revlon Mistletoe polish as a base for the first finger and the ring finger.
Once dry I then painted Ciate pink polish on the nail tip on the thumb then I applied the Sinful colors white polish above the Pink line tip and made a icing shape.using a pink nail art pen I did some stripes for the bottom of the cake.
I did the same on the Middle finger using the Maybellline pink polish as the nail tip and I did the same for the Topping using the Sinful colors white polish.
On theFirst finger and the ring finger I used the Technic nail art pen in white and did some stripes for the candle shapes. I went over 2 with the cream nail art pen.
(I used marker pens in yellow and red and bue for the candle stripes)not in picture sorry.
I used the dotting tool and applied random dots to the topping using the pink and green nail art pens.
For the flames I used the Manhattan polish and then the Revlon polish in Orange pop .
For the little finger I used the Manhattan polish for the cake topping.and did the same for the sprinkles using the dotting tool for the cake base I used the NYC polish then the cream nail art pen as the stripes.
I glued on the heart bead on the thumb and the other beads on the cakes. applied a top coat of glitter on some  of the nails and its ready make a wish and blow the candles and eat!


I am holding a tub of cake sprinkles for cakes!


There we have it my yummy cupcake nail art with candles.
I hope you all have a safe and happy weekend.
I have more posts shortly.
Please follow my blog if you haven't already and check out the other nail art challenge bloggers below Thank you :)
♡Dawn♡  


Related Posts Plugin for WordPress, Blogger...